The Gajumaru Walkthrough
Welcome to GajuMining
Thank you for contributing to a better system for everyone.
Important!
Please note that no other websites or shops are authorized to sell GajuMining licenses except for gajumining.com
All communications for mining Gajus will only be sent from official email addresses with the domain @gajumining.com
You may add @gajumining.com to your safe senders list. For Gmail, here is a guide on how to do that.
Protect yourself: always check the URL for spoofed characters and do not transact through any other websites or interact
with email addresses except those stated above. Do not click links from unofficial email addresses.
As one of the very first to stand with Gajumaru, you have the advantage of mining Gajus at its absolute easiest: hardware requirements are minimal. By making it easy for anyone to mine on any machine, our aim is to make sure that everyone has a chance to be part of this. To participate. To be able to create an economy of people, by people. It is with this aim in mind that we opened the door to everyone rather than to a select few.
This opportunity remains open to early supporters until mining opens to the public in 31st March 2027. Beyond that date, it is expected that hardware demands will rise, and mining Gajus will become more difficult as miner competition intensifies. Our aim is that by then, there will be so many of us that we ensure long term, sustainable, equitable decentralisation. Truly an economy for people by people.
After 31st March 2027, you can continue to use the software, but access to the GajuMining services–the website dashboard and tools, optimisations, updates and support, will require a subscription. You may choose to subscribe on a monthly or annual basis from 31st March 2027.
Pre-requisites
Using the Gaju Mining software requires very modest resources. However, you must have a dedicated computer connected to the internet with the GajuMine application running 24/7. Otherwise, your account will be idle and no rewards will be mined. To understand more about mining, click this for an explainer.
As an early miner, you have the advantage of mining with little hardware requirements and very little barrier-to-entry. It is easier to mine your full daily cap at present, before the whitelist period ends and public mining opens.
To mine Gajus, you only need to have the following:
1. Mining Computer
It is highly recommended that you dedicate a computer for mining to avoid interference from other applications using up the memory bandwidth.
- Operating systems: Windows, Linux, MacOS.
A minimum of 8GB memory (DDR4 RAM), more would be better. Please note that memory (RAM) is different from hard drive (storage), although both are commonly measured in gigabytes (GB).
Memory is usually a smaller number (4GB, 8GB, 16GB, 32GB, and so on).
Hard drives are usually in larger numbers and can go from gigabytes to terabytes (256GB, 500GB, 1TB, 2TB, and so on).
In the future, these requirements will change and acquiring Gajus will become more difficult as the competition for mining intensifies. This is expected to ramp up as we get closer to opening GajuMining to the public in 2027. By then, you should have a computer with a higher processing power in order to maximize the amount of Gajus you mine per day. The recommended guidance for Army Shinjin members is for an 24GB DDR4 RAM per mining core device.
2. GajuMine and GajuDesk
You would need to install GajuMine and GajuDesk on your computer. Your computer should be turned on and connected to the internet, with GajuMine running 24/7 in order to maximize the amount of Gajus you can mine per day. Instructions on how to install are covered in this guide.
3. Stable internet connection
To maximize your daily rewards, your miner should be running and connected to the internet 24/7.
Please note that your miner will cease to reap rewards if any of the following happens:
- The GajuMine application is closed.
Your computer loses internet connection.
Your computer loses power, or turns off even momentarily (ie for updates, power interruption)
It is your responsibility to periodically check that your miner is working and running properly. You will also need to restart the miner on a weekly or bi-weekly basis to have any updates installed to optimise your service. To do that, close GajuMine, wait a few minutes, and reopen it.
Getting Started
After purchasing a mining package through the GajuMining Shop, you should receive an email confirming your order. Within this email, you will find a button and a link that leads to your license activation code. This link is unique to you and the specific mining package you ordered. You will use this to log in to the website. DO NOT let anyone else access this link.Clicking the link will lead you to a web page with a GRIDS code. You will use this code later to connect your web
dashboard to your GajuDesk wallet after installation.
Under this code is also a link to https://gajumining.com/docs/mining/onboarding.
Click this link to go to the installation guides.
You can also access these guides by going to https://gajumining.com.
Under the How To menu, go to Guides.
Click First-time Set-up for Miners.
Installation
Following the steps above, on the Onboarding page, click the button with the corresponding guide for your operating system (Windows, Mac, Linux).Follow the instructions for installation.
- For Mac
You will choose between Silicon (ARM64) or Intel (x86). M1, M2, M3, and M4 families use Silicon, while some Apple models manufactured on or before June 2023 used Intel.
If you are unsure what hardware your computer has, Google the model number and add “arm64 or x86.” Based on the result, choose the right link between Apple Silicon Installer (ARM64) and Intel Mac Installer (x86).
If you are unsure which Mac model you have, you will need to check your system settings.
Go to the upper left corner of your screen and click on the Apple icon.
Select "About this Mac.” A window will pop up with your model number labelled as “Chip.”
After installation, you should find two (2) applications on your computer: GajuDesk (wallet) and GajuMine (miner).
GajuDesk Password and Mnemonic Phrase
Once installation has finished, open GajuDesk.The first time you open the application, you will be asked to choose between two options: “I’m new!” or “Open the wallet manager.”
Select the "I'm new!" option and let it set up a wallet and an account for you.
You will then be prompted to create a passphrase for your wallet. This is optional but we highly recommend that you do
so.
This passphrase is specifically for your GajuDesk wallet on the computer you are using, much like your lockscreen
password for your laptop or your phone, or your password for your online banking application. It keeps people from
accessing your wallet through your computer. You will be asked to provide this password every time you open your
GajuDesk wallet.
Typing in the wrong password will give an error message, “Bad Password,” and will not let you access the account.
Click OK to close this window.
On the window labeled “Wallets,” click Open and type in the correct password.
Click OK.
Important! Do not forget your password. Lost passwords cannot be retrieved.
Your account also has a mnemonic phrase which you can access through your GajuDesk wallet. This is the key to recovering your account should you lose access to your computer or your GajuDesk wallet.
On GajuDesk, you will find a button that says MNEMONIC.
Important: before you click this button, make sure you are in a secure and private location. Do not let anyone else see this mnemonic phrase.
Copy this on a piece of paper and keep it in a secure location that only you know of.
Do not lose your mnemonic phrase. Lost mnemonic phrases cannot be retrieved.
Do not let anyone see or access it. Anyone with access to this mnemonic phrase can steal your funds.
If you forget your GajuDesk password, you can retrieve your account using your mnemonic phrase. Go to the Mnemonic phrase and recovery section of this guide.
Connecting your wallet to your web dashboard
Once GajuDesk and GajuMine are installed, you can connect your gajumining.com account dashboard.Go to the link from your email, as instructed in the Getting Started section of this guide.
On that web page, copy the GRIDS code.
Open your GajuDesk wallet.
On the bottom right, click GRIDS URL.
A window will open with a blank field. Paste the code into the field. Click OK.
Your gajumining.com account dashboard should now be connected to your GajuDesk wallet.
The web page with the code should refresh and lead you to your Dashboard.
Connecting your Account ID to GajuMine
What we are going to do now is tell GajuMine which account(s) we are going to be mining on behalf of on this system.On your GajuDesk wallet, find the Copy button on the lower right (next to the account balance and account ID display).
Return to Launchpad and click the "GajuMine" link.
The first time you run GajuMine you will be presented with a configuration menu. At the top of this menu is a field
called "GajuMining Account ID".
Paste the account ID you copied from your GajuDesk wallet into this field and click "OK"
(If you have already run GajuMine out of curiosity and clicked away from this, don't worry, just click the "Configure" button at the bottom right of the GajuMine screen and the configuration screen will open.)
And that's it! GajuMine is now configured and you can click "Start." GajuMine will begin mining for your account.
Is it working?
To see if your miner is working, your GajuMine app should display something similar to this.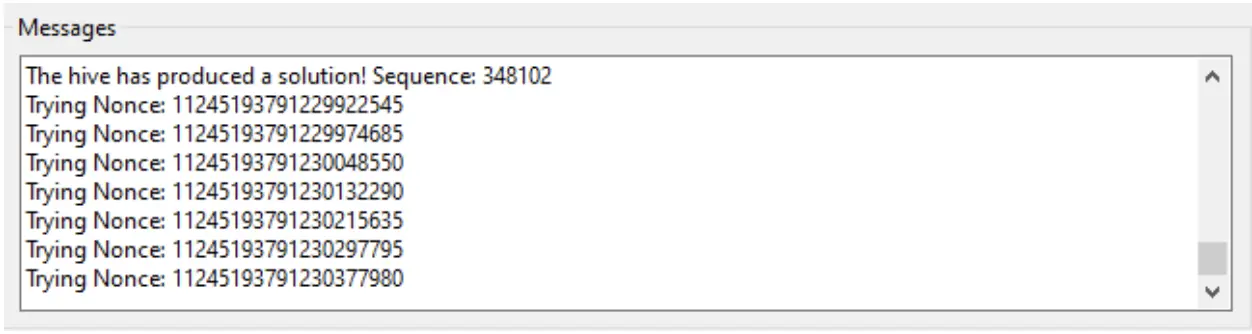
Periodically, you can also check and refresh your Dashboard on gajumining.com to see how much Gajus you have successfully mined.
Troubleshooting | What if it’s not working?
The first course of action would be to close the GajuMine application.Check your internet connection.
Give it a few minutes and reopen GajuMine. Click Start to start mining again.
If it still doesn’t work, try rebooting your computer and restarting the GajuMine app.
For Windows
For some reason, some Windows models do not come pre-packaged with certain libraries that came with older models by
default. These libraries are required for many applications, including GajuMine, to run.
- “VCRUNTIME140_1.dll is missing”
“The program can’t start because VCRUNTIME140_1.dll is missing from your computer.”
“The code execution cannot proceed because VCRUNTIME140_1.dll was not found. Reinstalling the program may fix this problem.”
To fix this issue, first close down both GajuMine and GajuDesk.
Then click this link and follow the instructions.
It will lead you to this Microsoft page where you can download the missing libraries and install them on your computer.
After installing the libraries, relaunch GajuMine and click Start.
In some cases, the user might encounter an error that reads:
- “Windows cannot access the specified device, path, or file. You may not have the appropriate permissions to access the
item.”
To fix this issue, you will have to install the application through a different account on your PC. These are the different “user accounts” you see when you log onto your computer at start-up, or when you “wake” your computer from idle mode. They are usually named after the user or sometimes labeled as “Guest.”
To create a new account on your computer, follow this guide.
Once you get that sorted, follow the same steps above to install GajuMine and GajuDesk while logged on to the new account.
As of 31 Dec 2025, Windows user account names that have a space in them (e.g. “Alice Bob,” with a space between) have issues with running GajuDesk and GajuMine. We are aware of this issue and are working on a fix. Temporarily, please create a new user account on your Windows PC that has a name without spaces (e.g. “Alice,” or “AliceBob”–no space), install GajuDesk and GajuMine on that account and run. We will update you once this issue has been resolved.
If you encounter other errors not covered in this Walkthrough, try checking this FAQ for more fixes.
If your issue is not covered in either this Walkthrough or the FAQ, please go to the Telegram channels.
End of Basic Set-up
GajuDesk Wallet Overview
Your GajuDesk wallet displays your Gajus and can be used to send Gajus to other accounts. Your balance will be displayed under your Account ID on the lower left, preceded by the symbol 木.Please note that Gajus you have mined are locked in a contract and will not automatically be displayed in your GajuDesk wallet until you withdraw it through your gajumining.com dashboard.
See Withdrawal guide.
Opening your GajuDesk wallet, you will see the following buttons:
- Create new key
This allows you to create a new account (and therefore a new Account ID). There is no limit to the number of accounts within a GajuDesk wallet.
Please note that each new account you create has its own unique mnemonic phrase–you must back each and every one of these mnemonic phrases to make sure you can recover the account later. One account’s mnemonic phrase cannot be used to recover another account, despite having been created through the same wallet.
- Recover
This allows you to recover a wallet by entering the mnemonic phrase for an Account ID you own.
- Mnemonic
Displays your mnemonic phrase, which you can use to recover your account should you lose access to your wallet or computer. Each account has its own unique mnemonic phrase. You must back up all mnemonic phrases for each account in case you lose access to your wallet or device.
One account’s mnemonic phrase cannot be used to recover another account, despite having been created through the same wallet. Lost mnemonic phrases cannot be recovered.
- Rename
Change the account name displayed on your GajuDesk wallet.
- Delete
Remove an Account ID. Do this only if you are sure you want to remove an account, and if you are sure you have saved and can access the mnemonic phrase should you wish to recover it. You can view the mnemonic phrase by clicking Mnemonic.
- Copy
Copy your Account ID to clipboard for pasting into other applications or windows. If someone wants to send Gajus to your wallet, you can click this to copy your wallet address and send it to the person who needs to send you Gajus.
- WWW
Opens the history of your account on GajuExplore.
- Send Money
Send Gajus to another account.
- GRIDS URL
Used to approve transactions and log-ins by using codes. Clicking this button will open a window with a blank field. This is used to sign messages and transactions by pasting codes into the field. Only sign messages if you trust the application, website, or person you are transacting with.
- Refresh
Reload the wallet; update balance.
- Contract Editor
Displayed on the upper left with the symbol ƒ(). This is only for advanced users. Contract calls can be made directly through GajuDesk.
Do not use this unless you know what you’re doing.
Web Account Dashboard
Your dashboard is what you see when you log in on gajumining.com. Signing in to your gajumining.com dashboard requires that you approve the log in using your GajuDesk wallet.Clicking Log in on gajumining.com will show you a GRIDS code. Copy this code.
Open your GajuDesk wallet. If you have set a password for your GajuDesk wallet, type it in and click OK.
Click GRIDS URL.
Paste the code into the field and click OK.
A Message Signature Request will pop up to confirm that you are logging in. Make sure that the originating URL is a gajumining.com link. Make sure there are no spoofed characters. Click OK. Go back to your browser window. Your gajumining.com log in page should refresh and open up your account dashboard.
Mnemonic phrase and recovery
If you forget your GajuDesk password or if you lost access to the computer or the application somehow, you can retrieve your account using the mnemonic phrase you copied at the beginning of this process.The mnemonic phrase is also referred to as simply "mnemonic" or any of the following words/phrases:
- passphrase, passkey
- seed phrase, secret phrase
- recovery phrase, recovery key
- backup phrase, backup key
- wallet backup, wallet key
Your mnemonic phrase is composed of several random words, usually between 12 and 24 words, and serves as the "password" to unlock or recover your account. Anyone who has this mnemonic phrase can access your account, and this is why you should never let anyone see it.
In the context of phones, the GajuDesk password is like the passcode to your online banking app. Your mnemonic phrase, on the other hand, is like the key to your vault in the bank–except you are your own bank.
Because you are your own bank, there is no one to help retrieve your mnemonic phrase should you lose it. And because all of this exists in the digital world, there is no physical vault to break to access your funds either. Do not lose your mnemonic phrase. Lost mnemonic phrases cannot be retrieved.
Unlike banking passwords, mnemonic phrases cannot be changed. They are automatically generated and cannot be edited.
IMPORTANT!!!
Each new account you create has its own unique mnemonic phrase–you must back up each and every one of
these mnemonic phrases to make sure you can recover the account later. One account’s mnemonic phrase cannot be used to
recover another account, despite having been created through the same wallet.
How do you recover your account using your mnemonic phrase?
If you typed in the wrong password into the GajuDesk login window, you will get a message that reads, “error, bad password.”Click OK to close this window.
On the Wallets window, click New. You will be asked for a Save location for the wallet file. Choose where you want to
save it and click Save.
This will lead you to creating a New Wallet.
Type in a name for this new wallet, and add a password through the Passphrase field (this is optional but recommended).
Remember this password. If you forget it, you will have to go through this process again.
Click OK. This will lead you back to the main wallet interface.
On the upper left, click Recover.
Type in your mnemonic phrase. Make sure the words are spelled correctly and are separated by single spaces.
Click OK.
If you have entered the correct mnemonic phrase, you should have access to the account with no issues. Your GajuDesk wallet would display the right account with the corresponding balance.
What do you do if you lose your mnemonic phrase?
Your mnemonic phrase is irretrievable once lost.
Who can help if you lose your password and/or mnemonic phrase?
As explained above, no one can help. You are your own bank.
GajuMine app overview
Your GajuMine application is pretty simple and straight-forward.- Start - start mining
Open Wallet - opens your GajuDesk wallet
GajuMining- opens gajumining.com
ChainExplorer - opens Groot chain explorer https://groot.mainnet.gajumaru.io/
Configure - click this to input the Account ID you’re mining for, or to add other Account IDs for multi-key mining. You can also move from mainnet to testnet. But please note that to get rewards for mining, you should remain on mainnet.
Multi-session Mining
Multi-session mining means mining for the same Account ID using multiple computers. It serves as a backup in case your primary mining computer stops mining for whatever reason–such as computer problems, power outage, calamities, etc. This is especially helpful in maximizing rewards particularly for those with higher-cap packages.We recommend that you ensure that your account is mined by at least two different computers, ideally from different locations. This helps decrease the possibility of them failing at the same time, and/or for the same reason, and ensure that you are accruing rewards even if there is a local failure with one miner.
A single Account ID can have up to 6 computers mining for it.
To use an additional computer to mine for an already existing account, simply copy the Account ID you want to mine for.
To do this, go to GajuDesk, click COPY on the bottom right after the Account ID.
You would have to send this address to yourself through a messaging app that you can access on your new mining computer.
Paste this address and send it to yourself.
On the new mining computer, access that Account ID.
Copy the whole Account ID.
Open GajuMine on your new mining computer.
On the bottom right, click CONFIGURE.
Paste the Account ID onto the first field that says GajuMining Account ID.
Click OK. This window will close and lead you back to the main GajuMine app window.
Click START to start mining.
Multi-key Mining
Multi-key mining means using the same miner (GajuMine application and computer) to mine for multiple Account IDs. If you’ve purchased multiple mining packages, you can add Account IDs to your GajuMine application.This can be done by clicking Configure on your GajuMine application, and pasting the Account ID into the field that says
Additional Account IDs.
Click OK to confirm.
You can mine for up to 100 Account IDs per device.
Note that it's unlikely that a single miner can reach the maximum daily rewards for 100 accounts, unless these are all very small packages. But there is no extra overhead for carrying multiple accounts - the work produced by the miner is split equally across all accounts.
Note that for now, this means that it makes the most sense to have packages of equal size in a single miner.
Withdrawal
You can log in to your account dashboard on gajumining.com and withdraw your Gajus!- Click Log In on gajumining.com and follow the instructions to sign in through GajuDesk.
- On your dashboard, under Accumulated Rewards, click Payout.
- On the next window, click Generate transaction to be signed. This will open a small window.
- Copy the code displayed.
- Open GajuDesk. Make sure to select the Account you intend to withdraw from.
- Click Grids URL on the bottom right.
- Paste the code you copied earlier.
- Click OK.
- A window will open Transaction Signature Request.
- Click OK.
Your withdrawal should be completed within a few seconds.
After this, your dashboard on gajumining.com will display a zero balance under Accumulated Rewards. Do not panic. This is because your balance has been transferred into your wallet, which you can access through GajuDesk. Just wait a few seconds and recheck.
You can check your balance on the ChainExplorer by copying your Account ID and pasting it into the search bar on https://groot.mainnet.gajumaru.io/
You can also access the ChainExplorer directly through a shortcut button on your GajuMine app.
Please note that once you withdraw your Gajus from your dashboard and into your account, they fully become your responsibility.
Sending Gajus to another wallet
Whether you are sending Gajus to another person, or to another wallet that you own, you can send Gajus directly through your GajuDesk wallet.First, make sure that you have withdrawn enough Gajus from your account dashboard on gajumining.com to your GajuDesk wallet. Please see the guide for Withdrawal above.
- To send Gajus to another account, click Send Money on the bottom left of your GajuDesk wallet.
A window will open where you can fill in details of the transaction.
Input the recipient Account ID on the line “To.” It would be easier to copy this Account ID and paste it into the field.
Please note that Gajus sent to a wrong address cannot be retrieved. Always double, triple-check addresses before signing transactions.
Fill in the amount of Gajus you want to send.
You can add a message but this is not required.
Check your transaction details.
Click OK.
TTL
This is automatically computed. It is best not to change it and to keep it at default.
Gas price
Gas price is the amount of transaction fee you are paying for the transaction. It is set to a default and you may leave
it as is.
Offering a higher transaction fee signals to the network that you want your transaction prioritized by miners. However,
the only time it would make sense to increase this value is when the volume of transactions on the Gajumaru blockchain
has increased substantially and you want to minimize your wait time. But even then, it is expected that transaction
times would still take only a few seconds.